开发指南
1. 代码仓目录说明
1.1 顶层目录结构
├── build                              # 构建脚本
├── docs                               # 项目文档
├── e2e                                # 端到端测试用例
├── modules                            # 前端模块目录
│   ├── build                          # 前端构建脚本
│   ├── cluster                        # 概览、通信模块
│   ├── compute                        # 算子调优模块
│   ├── framework                      # 前端主框架模块(基础功能)
│   ├── leaks                          # 内存泄露检查模块
│   ├── lib                            # 公共库目录
│   ├── memory                         # 内存模块
│   ├── memory-on-chip                 # 片上内存模块
│   ├── operator                       # 算子模块
│   ├── reinforcement-learning         # 强化学习模块
│   ├── statistic                      # 服务化调优模块
│   ├── timeline                       # 时间线模块
│   └── triton                         # Triton 模块
├── platform                           # 底座目录(Rust/Tauri)
├── plugins                            # 插件目录
├── scripts                            # 脚本目录
└── server                             # 后端服务模块
    ├── build                          # 构建脚本
    ├── cmake                          # CMake 配置脚本
    ├── src                            # 后端源码
    │   ├── channel                    # 网络通讯
    │   ├── defs                       # 全局定义
    │   ├── entry/server/bin           # 程序入口
    │   ├── protocol                   # 消息定义
    │   ├── modules                    # 业务模块
    │   │   ├── base                   # 模块共用基类
    │   │   ├── global                 # 全局消息
    │   │   ├── timeline               # timeline 消息处理
    │   │   │   ├── core               # 核心处理逻辑
    │   │   │   ├── handler            # 消息处理
    │   │   │   └── protocol           # 消息格式转换
    │   │   └── ...                    # 其他业务模块
    │   ├── server                     # server 服务
    │   ├── test                       # 后端开发者测试
    │   └── utils                      # 工具类
    └── third_party                    # 第三方依赖
1.2 前端模块说明
文件夹名称 |
对应模块 |
|---|---|
cluster |
概览(summary)、通信(communication) |
compute |
算子调优 |
framework |
基础功能(微前端基座) |
leaks |
内存泄露检查 |
memory |
内存 |
operator |
算子 |
reinforcement-learning |
强化学习 |
statistic |
服务化调优 |
timeline |
时间线 |
1.3 开发者文档地图
建议按以下顺序阅读开发者文档:
场景 |
推荐阅读 |
|---|---|
首次参与开发 |
本文 |
新增前端/后端模块 |
本文 |
新增或维护 Timeline 泳道 |
本文 |
维护概览和通信模块 |
Summary、Communication |
维护内存模块 |
Memory、Device 内存分析、Snapshot 分析 |
维护算子和算子调优模块 |
Operator、Compute |
阅读设计文档时,请优先确认文档中的代码路径、接口命令和数据结构是否仍与源码一致。若修改接口、数据字段或页面交互,应同步更新对应设计文档。
2. Linux 环境快速搭建与运行
MindStudio Insight 是跨平台工具,本文默认以 Linux 开发环境 为主线说明本地开发、调试和提交流程。Windows、macOS、CLion 工具链配置以及各平台出包环境准备请参见开发环境搭建。
2.1 准备基础依赖
Linux 本地开发建议准备如下工具:
软件名 |
版本要求 |
用途 |
|---|---|---|
git |
无特殊要求 |
代码拉取与提交 |
Node.js |
v18.20.8+ |
前端开发与构建 |
pnpm |
建议使用与 lockfile 兼容的版本 |
前端包管理 |
Python |
3.11+ |
工具脚本、pre-commit、第三方依赖预处理 |
CMake |
3.16~3.20 |
后端项目构建与编译 |
GCC/G++ 或 Clang |
使用操作系统稳定版本 |
后端编译 |
Ninja |
无特殊要求,推荐安装 |
后端构建 |
Ubuntu / Debian 系统可参考:
sudo apt update
sudo apt install -y git python3 python3-pip cmake ninja-build build-essential
openEuler / CentOS / RHEL 类系统可参考:
sudo yum install -y git python3 python3-pip cmake ninja-build gcc gcc-c++
Node.js 建议通过官方安装包、系统包管理器或版本管理工具安装,并确保版本满足 v18.20.8+。
完成安装后可执行如下命令验证:
git --version
node --version
python3 --version
cmake --version
g++ --version
ninja --version
2.2 获取代码
建议先 Fork 代码到个人仓库,再 clone 到本地,并配置官方仓库为 upstream。
git clone https://gitcode.com/<your-user>/msinsight.git
cd msinsight
git remote add upstream https://gitcode.com/Ascend/msinsight.git
git remote -v
如只需只读查看源码,也可以直接 clone 官方仓库:
git clone https://gitcode.com/Ascend/msinsight.git
cd msinsight
2.3 初始化后端依赖
首次进行后端编译或使用 IDE 重新加载 CMake 项目前,需下载并预处理第三方依赖。执行该步骤前请保证网络畅通;若处于代理环境,请提前配置 git、pip、npm/pnpm 等工具的代理或镜像源。
cd server/build
python3 download_third_party.py
python3 preprocess_third_party.py
2.4 构建并启动后端
在 server/build 目录执行后端构建脚本:
python3 build.py build
构建产物位于 server/output/linux-<架构>/bin 目录,其中 <架构> 通常为 x86_64 或 aarch64。启动 profiler_server 时建议显式指定 WebSocket 端口,避免和本机已打开的 Insight 桌面端应用冲突。
cd ../output/linux-$(uname -m)/bin
./profiler_server --wsPort=9000
如需在 CLion 中调试后端,可打开 server 目录,重新加载 CMake 项目后运行 profiler_server 目标,并在启动参数中配置 --wsPort=9000。如果本机已打开 Insight 桌面端应用,建议关闭应用或改用 9050~9099 范围内的端口。
2.5 安装并启动前端
安装 pnpm 和前端依赖:
npm install -g pnpm
cd modules
pnpm install
MindStudio Insight 采用模块化前端设计,framework 模块为基础功能模块,其他模块可按需启动加载。至少需要先启动 framework 模块:
cd framework
pnpm start
如需调试具体业务模块,可在新的终端进入对应模块目录并执行:
pnpm start
前后端均启动后,在浏览器访问 http://localhost:5174 打开开发者环境下的 MindStudio Insight。
2.6 配置 pre-commit
pre-commit 是基于 Git 钩子的代码质量管控工具,项目要求本地启用 pre-commit,提交前完成代码校验和格式规范化。
python3 -m pip install pre-commit
pre-commit install
提交前检查已暂存文件:
git add <修改过的文件>
pre-commit run
如需检查全仓文件:
pre-commit run --all-files
检查过程中,格式化类问题(如代码缩进、换行等)会被自动修复,修复后需重新 git add <修改过的文件>。未能自动修复的错误请根据提示人工修复。前端 modules 目录下暂存的 js/jsx/ts/tsx 文件会在 pre-commit 阶段执行 ESLint 检查;pre-commit 只检查暂存文件,不能替代 CI 中的全量 cd modules && pnpm lint。
2.7 本地出包入口
Linux 环境完成基础依赖、后端第三方依赖和前端依赖初始化后,可在项目根目录执行本地出包脚本:
cd build
python3 build.py
产物位于项目根目录 out 目录下。Windows 和 macOS 出包需要额外准备 Rust、平台运行时、打包工具和集成 Python 解释器,详见开发环境搭建。
3. 开发流程
3.1 新增模块开发
3.1.1 前端部分
1. 添加新模块目录
在 modules 目录下创建新的模块,参考如下目录结构:
.
├── modules
│   ├── framework
│   ├── new_module
│   │   ├── src
│   │   │   ├── assets
│   │   │   ├── components
│   │   │   ├── connection
│   │   │   ├── store
│   │   │   ├── theme
│   │   │   ├── units
│   │   │   ├── App.tsx
│   │   │   ├── index.tsx
│   │   │   └── index.css
│   │   ├── craco.config.js
│   │   ├── tsconfig.json
│   │   └── package.json
│   └── package.json
2. 构建配置
craco.config.js:
const { webpackCfg, configureConfig } = require("../build-config");

const path = require("path");

const libPath = path.resolve(__dirname, "../lib/src");
const echartsPath = require.resolve("echarts");

module.exports = {
  devServer: {
    port: 3001,
    open: false,
    client: {
      overlay: {
        runtimeErrors: (error) => {
          // 禁止界面展示错误:ResizeObserver loop completed with undelivered notifications
          return !error?.message.includes("ResizeObserver");
        },
      },
    },
  },
  webpack: {
    alias: webpackCfg.alias,
    configure: (webpackConfig) => {
      return configureConfig(webpackConfig, [libPath, echartsPath]);
    },
  },
};
3. 基础 scripts 配置
package.json:
{
    "scripts": {
        "start": "cross-env NODE_OPTIONS=--openssl-legacy-provider craco start",
        "build": "cross-env NODE_OPTIONS=--openssl-legacy-provider NODE_ENV=production GENERATE_SOURCEMAP=false CI=false craco build",
        "build:dev": "cross-env GENERATE_SOURCEMAP=true CI=false craco build",
        "..." : "// 自定义配置"
    }
}
4. src 中必要模块
theme:主题
theme/index.ts:
export { themeInstance } from "@insight/lib/theme";
export type { ThemeItem } from "@insight/lib/theme";
connection:通信
connection/index.ts:
import { ClientConnector } from "@insight/lib/connection";
export default new ClientConnector({
  getTargetWindow: (): any[] => [window.parent],
  module: [new_module_request_name],
});
其他部分根据新模块的实际需求自定义。
5. 在主服务中加入新模块(微服务)
framework 模块的 moduleConfig.ts 中,在 modulesConfig 中配置新模块:
{
    name: [new_module],   // 新模块的微服务名,自定义
    requestName: [new_module_request_name], // 前后端交互的模块名,与后端协定
    attributes: {
        src: isDev ? 'http://localhost:[new_port]/' : './plugins/[new_module]/index.html', // 本地开发端口自行分配
    },
    isDefault: true, // 默认是否显示该微服务
    // ... 其他配置条件
}
6. 在 ModuleConfig 接口中添加新模块的属性
代码来源: modules/framework/src/moduleConfig.ts
export interface ModuleConfig {
    name: string;
    requestName: Lowercase<string>;
    attributes: IframeHTMLAttributes<HTMLIFrameElement>;
    isDefault?: boolean;
    isCluster?: boolean;
    isCompute?: boolean;
    isLeaks?: boolean;
    isIE?: boolean;
    isRL?: boolean;
    hasCachelineRecords?: boolean;
    isOnlyTraceJson?: boolean;
    isHybridParse?: boolean;
    // 在此处添加新模块的属性
}
7. 在更新数据场景中添加新模块处理
代码来源: modules/framework/src/components/TabPane/Index.tsx
export function updateDataScene(data: Record<string, any>): void {
    const sceneInfo = {
        // 在此处添加新增模块,对应数据更新
        isCluster: data.isCluster ?? false,
        isReset: data.reset ?? false,
        isIpynb: data.isIpynb ?? false,
        isBinary: data.isBinary ?? false,
        hasCachelineRecords: data.hasCachelineRecords ?? false,
        isOnlyTraceJson: data.isOnlyTraceJson ?? false,
        instrVersion: data.instrVersion ?? -1,
        isLeaks: data.isLeaks ?? false,
        isIE: data.isIE ?? false,
        isRL: false,
        isHybridParse: data.isCluster && data.isIE,
    };
    updateSession(sceneInfo);
}

// 在此处添加新增模块,对应页签改变的处理
useEffect(() => {
    if (session.isBinary === null && session.isCluster === null) {
        return;
    }
    setScene(session.scene);
    setDataCompose({ hasCachelineRecords: session.hasCachelineRecords, isRL: session.isRL });
}, [session.isBinary, session.isCluster, session.hasCachelineRecords, session.isOnlyTraceJson, session.isIE, session.isLeaks, session.isRL, session.isHybridParse]);
8. 在 Session 类中添加新模块场景
代码来源: modules/framework/src/entity/session.ts
// Scene:数据场景:默认、集群、算子调优、Leaks、只trace.json文件
export type Scene = 'Default' | 'Cluster' | 'Compute' | 'OnlyTraceJson' | 'IE' | 'Leaks' | 'RL' | 'HybridParse';

export class Session {
    isCluster: boolean | null = false;
    isBinary: boolean | null = false;
    isIE: boolean | null = false;
    isReset: boolean = false;
    isFullDb: boolean = false;
    isOnlyTraceJson: boolean = false;
    isLeaks: boolean = false;
    isRL: boolean = false;
    isHybridParse: boolean = false;
    hasCachelineRecords: boolean = false;
    instrVersion: number = -1;
    // 在此处添加新模块场景属性

    get scene(): Scene {
        let scene: Scene;
        if (this.isHybridParse) {
            scene = 'HybridParse';
        } else if (this.isOnlyTraceJson) {
            scene = 'OnlyTraceJson';
        } else if (this.isLeaks) {
            scene = 'Leaks';
        } else if (this.isBinary) {
            scene = 'Compute';
        } else if (this.isCluster) {
            scene = 'Cluster';
        } else if (this.isIE) {
            scene = 'IE';
        } else {
            scene = 'Default';
        }
        return scene;
    }
    // ...
}
9. 在公共模块中添加查询接口和中英文翻译
代码来源: modules/lib/src/connection/index.ts
// 新增模块的查询接口要写在 connection 中
代码来源: modules/lib/src/i18n/index.ts
// 新增模块的中英文切换由公共模块统一管理
import xxxEn from './xxx/en.json';
import xxxZh from './xxx/zh.json';

export const resources = {
    enUS: {
        ...en,
        ...frameworkEn,
        ...xxxEn,
    },
    zhCN: {
        ...zh,
        ...frameworkZh,
        ...xxxZh,
    },
};
10. 构建脚本更新
代码来源: build/build.py
新增模块的构建后清理:
def clean():
    out = os.path.join(PROJECT_PATH, Const.OUT_DIR)
    if os.path.exists(out):
        shutil.rmtree(out)
    ascend_insight = os.path.join(PROJECT_PATH, Const.PRODUCT_DIR)
    if os.path.exists(ascend_insight):
        shutil.rmtree(ascend_insight)
    framework_dist = os.path.join(PROJECT_PATH, Const.MODULES_DIR, Const.FRAMEWORK_DIR, 'build')
    if os.path.exists(framework_dist):
        shutil.rmtree(framework_dist)
    # 需在此处添加你的新增模块
    modules = ['cluster', 'memory', 'timeline', 'compute', 'jupyter', 'operator', 'lib', 'statistic', 'leaks',
               'reinforcement-learning']
    for module in modules:
        build_dir = os.path.join(PROJECT_PATH, Const.MODULES_DIR, module, Const.BUILD_DIR)
        if os.path.exists(build_dir):
            shutil.rmtree(build_dir)
新增模块的名称以及构建:
# 在这里添加你的模块以及对应的模块名称
MODULES_MAP = {
    'cluster': 'Cluster',
    'reinforcement-learning': 'RL',
    'memory': 'Memory',
    'operator': 'Operator',
    'compute': 'Compute',
    'statistic': 'Statistic',
    'leaks': 'Leaks',
    'timeline': 'Timeline',
}
3.1.2 后端部分
1. 后端模块目录结构
server
├── src
│   └── modules
│       └── xxx_module
│           ├── database
│           │   ├── xxxBase.h
│           │   └── xxxBase.cpp
│           ├── handler
│           └── protocol
2. 协议处理
代码来源: server/msinsight/include/base/ProtocolUtil.h
JSON 的协议处理、Response 的传递在这里编写:
struct JsonResponse : public Response {
    explicit JsonResponse(const std::string &command) : Response(command) {}
    [[nodiscard]] virtual std::optional<document_t> ToJson() const = 0;
};

struct Event : public ProtocolMessage {
    explicit Event(const std::string &e) : event(e)
    {
        type = ProtocolMessage::Type::EVENT;
    }
    ~Event() override = default;
    std::string event;
    bool result = false;
};

struct JsonEvent : public Event {
    explicit JsonEvent(const std::string &e) : Event(e) {}
    [[nodiscard]] virtual std::optional<document_t> ToJson() const = 0;
};

class ProtocolUtil {
public:
    ProtocolUtil() = default;
    virtual ~ProtocolUtil() = default;

    void Register();
    void UnRegister();

    std::unique_ptr<Request> FromJson(const json_t &requestJson, std::string &error);
    std::optional<document_t> ToJson(const Response &response, std::string &error);
    std::optional<document_t> ToJson(const Event &event, std::string &error);

    static bool SetRequestBaseInfo(Request &request, const json_t &json);
    static void SetResponseJsonBaseInfo(const Response &response, document_t &json);
    static void SetEventJsonBaseInfo(const Event &event, document_t &json);

    template <class SubRequest>
    static std::unique_ptr<Request> BuildRequestFromJson(const json_t &json, std::string &error)
    {
        static_assert(std::is_same_v<std::unique_ptr<Request>, decltype(SubRequest::FromJson(json, error))>,
                      "SubRequest must have a static FromJson method returning std::unique_ptr<Request>");
        return SubRequest::FromJson(json, error);
    }

    static std::optional<document_t> CommonResponseToJson(const Response &response)
    {
        try {
            const auto& jsonResponse = dynamic_cast<const JsonResponse&>(response);
            return jsonResponse.ToJson();
        } catch (const std::bad_cast& e) {
            return std::nullopt;
        }
    }
    // ...
};
3. CMake 配置
代码来源: server/src/CMakeLists.txt
# new Module
include_directories(${SRC_HOME_DIR}/modules/xxx)
include_directories(${SRC_HOME_DIR}/modules/xxx/xxx)

# new Module
aux_source_directory(${SRC_HOME_DIR}/modules/xxx xxx_xxx_SRC)

list(APPEND DIC_MODULES_SRC_LIST
        ${DIC_MODULES_XXX_SRC}
        ${DIC_MODULES_XXX_XXX_SRC}
)
4. 注册 Plugin
代码来源: server/src/modules/Plugins.cpp
/*
 * -------------------------------------------------------------------------
 * This file is part of the MindStudio project.
 * Copyright (c) 2025 Huawei Technologies Co.,Ltd.
 *
 * MindStudio is licensed under Mulan PSL v2.
 * You can use this software according to the terms and conditions of the Mulan PSL v2.
 * You may obtain a copy of Mulan PSL v2 at:
 *
 *          https://license.coscl.org.cn/MulanPSL2
 *
 * THIS SOFTWARE IS PROVIDED ON AN "AS IS" BASIS, WITHOUT WARRANTIES OF ANY KIND,
 * EITHER EXPRESS OR IMPLIED, INCLUDING BUT NOT LIMITED TO NON-INFRINGEMENT,
 * MERCHANTABILITY OR FIT FOR A PARTICULAR PURPOSE.
 * See the Mulan PSL v2 for more details.
 * -------------------------------------------------------------------------
 */
#include "AdvisorPlugin.h"
#include "GlobalPlugin.h"
#include "MemoryPlugin.h"
#include "OperatorPlugin.h"
#include "SourcePlugin.h"
#include "SummaryPlugin.h"
#include "TimelinePlugin.h"
#include "JupyterPlugin.h"
#include "CommunicationPlugin.h"
#include "IEPlugin.h"
#include "MemoryDetailPlugin.h"
// 在此处添加新模块相关信息
namespace Dic::Module {
    Core::PluginRegister ADVISOR_PLUGIN(std::make_unique<Advisor::AdvisorPlugin>());
    Core::PluginRegister GLOBAL_PLUGIN(std::make_unique<Global::GlobalPlugin>());
    Core::PluginRegister MEMORY_PLUGIN(std::make_unique<Memory::MemoryPlugin>());
    Core::PluginRegister OPERATOR_PLUGIN(std::make_unique<Operator::OperatorPlugin>());
    Core::PluginRegister SOURCE_PLUGIN(std::make_unique<Source::SourcePlugin>());
    Core::PluginRegister SUMMARY_PLUGIN(std::make_unique<Summary::SummaryPlugin>());
    Core::PluginRegister TIMELINE_PLUGIN(std::make_unique<Timeline::TimelinePlugin>());
    Core::PluginRegister JUPYTER_PLUGIN(std::make_unique<Jupyter::JupyterPlugin>());
    Core::PluginRegister COMM_PLUGIN(std::make_unique<Communication::CommunicationPlugin>());
    Core::PluginRegister IE_PLUGIN(std::make_unique<IE::IEPlugin>());
    Core::PluginRegister MEMORY_DETAIL_PLUGIN(std::make_unique<MemoryDetail::MemoryDetailPlugin>());
}
5. 添加模块名常量
代码来源: server/src/modules/defs/ProtocolDefs.h
// 在此处添加新模块信息
const std::string MODULE_XXX = "xxx";

const std::string MODULE_SUMMARY = "summary";
const std::string MODULE_COMMUNICATION = "communication";
const std::string MODULE_MEMORY = "memory";
const std::string MODULE_MEMORY_DETAIL = "memory_detail";
const std::string MODULE_OPERATOR = "operator";
const std::string MODULE_SOURCE = "source";
const std::string MODULE_ADVISOR = "advisor";
6. 全量 DB 查询(如涉及)
代码来源: server/src/modules/full_db/database/FullDbParser.cpp
// 如果涉及全量db查询,请在此添加查询
void FullDbParser::Reset()

void FullDbParser::BuildProfilingInitTask(
    std::shared_ptr<std::vector<std::future<void>>> &futures,
    std::string &dbId,
    std::unique_ptr<ThreadPool> &pool)
3.2 DB 场景新增泳道
3.2.1 前端部分
1. 配置 DB 场景显示模块
framework/src/moduleConfig.ts:
[
    {
        name: 'Timeline',
        requestName: 'timeline',
        attributes: {
            src: isDev ? 'http://localhost:3000/' : './plugins/Timeline/index.html',
        },
        isIE: true,
    },
    {
        name: 'Statistic',
        requestName: 'statistic',
        attributes: {
            src: isDev ? 'http://localhost:3006/' : './plugins/Statistic/index.html',
        },
        isIE: true,
    }
]
2. 导入 DB 文件
选择 DB 文件并发送解析指令 import/action。
代码来源: modules/framework/src/units/Project.tsx
async function handleProjectAction({ action, project, isConflict, selectedFileType, selectedFilePath, selectedRankId }:
{action: ProjectAction;project: Project;isConflict: boolean;selectedFileType?: LayerType;selectedFilePath?: string;selectedRankId?: string}): Promise<void> {
    // ...
    runInAction(async() => {
        // ...
        const res = await addDataPath(newProject, action, isConflict, session);
        // ...
    });
    // ...
}
3. 主服务将解析结果发送给微服务
代码来源: modules/framework/src/centralServer/server.ts
export const addDataPath = async function(project: Project, action: ProjectAction, isConflict: boolean, session: Session): Promise<boolean> {
    // ...
    connector.send({
        event: 'remote/import',
        body: { dataSource: transformTimelineDataSource(project), importResult: res, switchProject },
        target: 'plugin',
    });
    // ...
}
4. 微服务处理数据生成卡/泳道菜单
代码来源: modules/timeline/src/connection/handler.ts
export const importRemoteHandler: NotificationHandler = async (data): Promise<void> => {
    // ...
    runInAction(() => {
        initUnitInfo(session, result, dataSource, isNeedResetRankId); // 根据解析结果初始化泳道信息
    });
    sendSessionUpdate(result, session);
    // ...
}
5. 微服务接收并处理卡解析结果
代码来源: modules/timeline/src/connection/handler.ts
export const parseSuccessHandler: NotificationHandler = (data): void => {
    // ...
}
6. 微服务获取泳道数据并绘制泳道图
代码来源: modules/timeline/src/insight/units/AscendUnit.tsx
const ThreadUnit = unit<ThreadMetaData>({
    name: 'Thread',
    pinType: 'copied',
    chart: chart()
})
3.2.2 后端部分
创建一个 profiler.db 文件

表结构说明
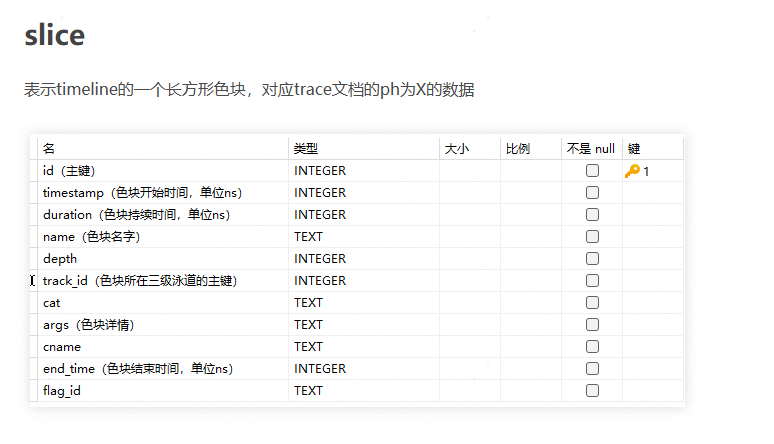
1. slice(叶子泳道色块数据)
表示 timeline 的一个长方形色块,对应 trace 文档中 ph 为 X 的数据。

CREATE TABLE slice (
    id INTEGER PRIMARY KEY AUTOINCREMENT,
    timestamp INTEGER,
    duration INTEGER,
    name TEXT,
    depth INTEGER,
    track_id INTEGER,
    cat TEXT,
    args TEXT,
    cname TEXT,
    end_time INTEGER,
    flag_id TEXT
);
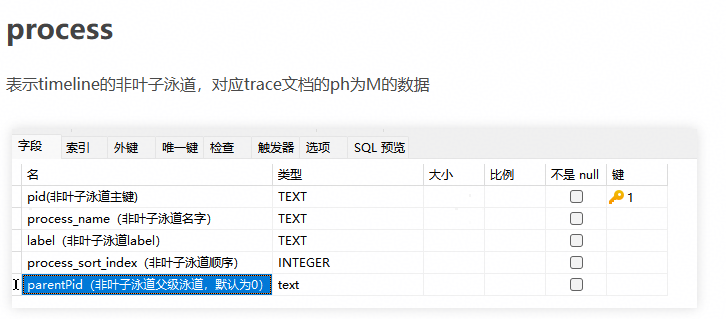
2. process(非叶子泳道)
表示 timeline 的非叶子泳道,对应 trace 文档中 ph 为 M 的数据。
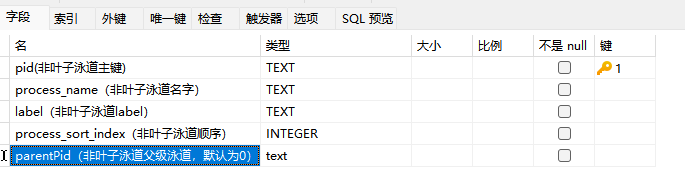
CREATE TABLE "process" (
    "pid" TEXT,
    "process_name" TEXT,
    "label" TEXT,
    "process_sort_index" INTEGER,
    "parentPid" TEXT,
    PRIMARY KEY ("pid")
);
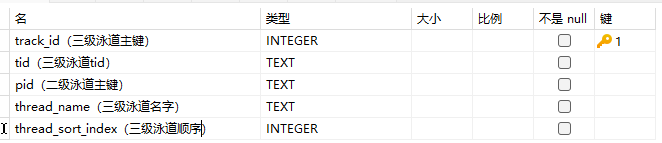
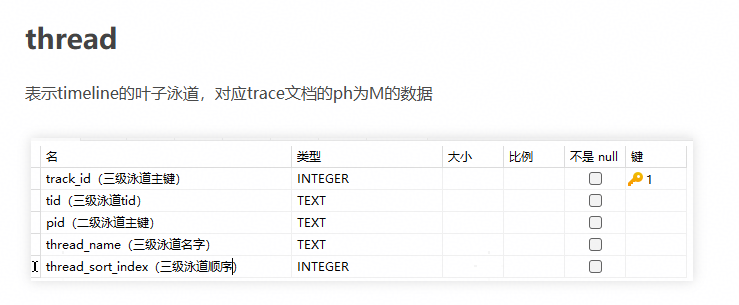
3. thread(叶子泳道)
表示 timeline 的叶子泳道,对应 trace 文档中 ph 为 M 的数据。
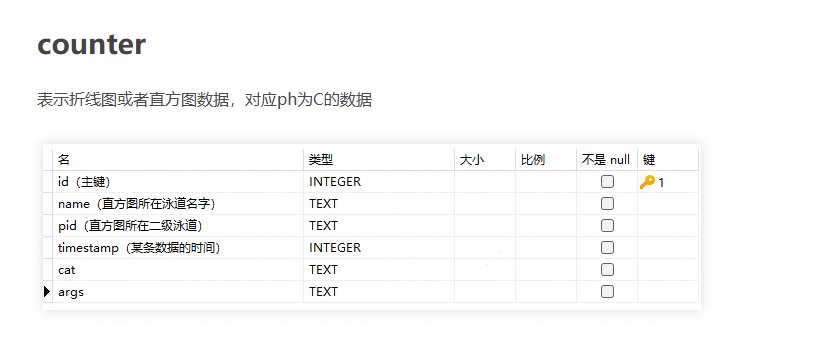
4. counter(折线图/直方图数据)
表示折线图或者直方图数据,对应 ph 为 C 的数据。
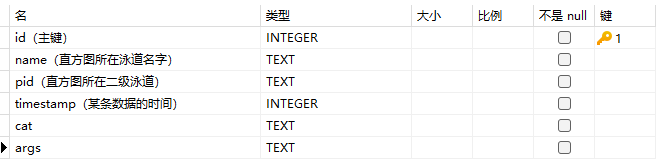
CREATE TABLE counter (
    id INTEGER PRIMARY KEY AUTOINCREMENT,
    name TEXT,
    pid TEXT,
    timestamp INTEGER,
    cat TEXT,
    args TEXT
);
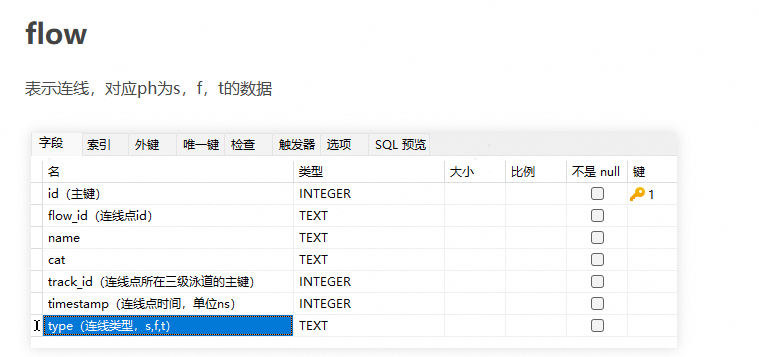
5. flow(连线数据)
表示连线,对应 ph 为 s、f、t 的数据。
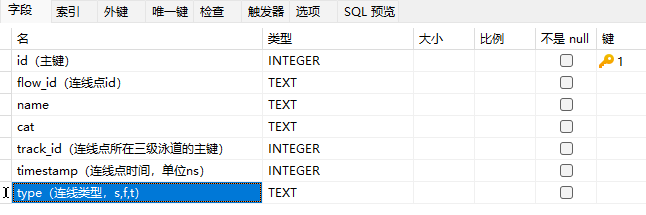
CREATE TABLE flow (
    id INTEGER PRIMARY KEY AUTOINCREMENT,
    flow_id TEXT,
    name TEXT,
    cat TEXT,
    track_id INTEGER,
    timestamp INTEGER,
    type TEXT
);
6. dataTable(纯表展示的表)
表示哪些表需要按照纯表方式展示。

表字段说明:

CREATE TABLE "data_table" (
    "id" INTEGER NOT NULL,
    "name" TEXT,
    "view_name" TEXT,
    PRIMARY KEY ("id")
);
7. data_link(字段关联关系)
表示字段与某张表的某个字段的关联关系。
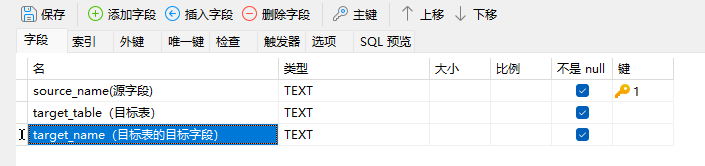
CREATE TABLE "data_link" (
    "source_name" TEXT NOT NULL,
    "target_table" TEXT NOT NULL,
    "target_name" TEXT NOT NULL,
    PRIMARY KEY ("source_name")
);
8. translate(中英文翻译)
表示文本的中英文翻译。
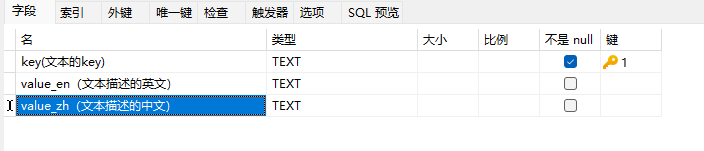
CREATE TABLE "translate" (
    "key" TEXT NOT NULL,
    "value_en" TEXT,
    "value_zh" TEXT,
    PRIMARY KEY ("key")
);
添加数据操作示意
添加非叶子泳道:在 process 表里添加二级泳道数据
添加叶子泳道
添加叶子泳道里的色块数据
添加色块关联关系
添加直方图数据
创建好的 profiler.db 拖入 Insight 即可看见新增泳道
4. 测试指南
4.1 后端开发者测试
4.1.1 测试框架与构建方式
测试框架:GoogleTest + GMock
Mock 框架:mockcpp(通过 ExternalProject 自动构建)
两种构建模式:
构建模式 |
触发方式 |
覆盖率插桩 |
适用场景 |
|---|---|---|---|
完整测试构建 |
CMake 添加 |
启用(-fprofile-arcs -ftest-coverage) |
CI 流水线、覆盖率统计 |
开发测试构建 |
CMake 环境变量 |
不启用 |
本地开发快速验证 |
在 CLion 设置的构建、执行、部署中的CMake选项中添加环境变量 DEV_TYPE=true,然后重新加载 CMake,即可构建 insight_test 可执行文件。
完整测试构建(含覆盖率)需在 Linux 上执行:
cd build
python3 build.py test
4.1.2 测试目录结构
后端 DT 代码位于 server/src/test:
server/src/test/
├── CMakeLists.txt                  # 测试 CMake 配置
├── TestSuit.h / TestSuit.cpp       # 主集成 Fixture
├── DatabaseTestConst.h / .cpp      # 共享建表 DDL 常量
├── DatabaseTestCaseMockUtil.h       # 内存 SQLite 工具
├── FullDbTestSuit.cpp              # 全量 DB 解析集成测试 Fixture
├── framework/
│   ├── DtFramework.h               # 测试数据路径解析工具
│   └── DtFramework.cpp
├── mock/
│   └── MockDatabase.h              # 通用内存 SQLite Mock 工厂
├── modules/                        # 按模块组织的测试代码
├── fuzz/                           # 模糊测试(仅 _PROJECT_TYPE=fuzz 时构建)
├── performance/                    # 性能基准测试
├── server/                         # WebSocket 服务端测试
├── test_data/                      # 测试固件数据
└── utils/                          # 工具函数测试
4.1.3 测试命名规范
Fixture 命名:
<模块名><组件名>Test,如MemoryHandlerTest、CommunicationProtocolRequestTest用例命名:
功能式:
QueryComputeStatisticsData(描述测试的功能)场景式:
TestFindSliceByAllocationTimeHandlerWhenTimelineNotExist(描述测试场景)参数校验式:
OperatorDetailsParamTest(验证参数边界)安全注入式:
TestOpenDbWithPathInject(验证路径注入等安全问题)
无状态工具测试:使用
TEST(UtilName, FunctionName),如TEST(StringUtil, IntToString)
4.1.4 新增测试用例步骤
创建测试文件:在
server/src/test/modules/<模块名>/下创建测试文件,如<模块名><组件>Test.cpp编写测试 Fixture 与用例:使用
TEST_F(FixtureName, CaseName)宏编写更新 CMakeLists.txt:在
server/src/test/CMakeLists.txt中添加新的aux_source_directory条目构建并运行:重新加载 CMake 项目后构建
insight_test,执行测试验证
常用命令:
# 执行全部测试
./insight_test

# 执行指定测试套件或用例
./insight_test --gtest_filter=TestSuit.*
./insight_test --gtest_filter=TestSuit.QueryComputeStatisticsData

# 列出所有用例名称
./insight_test --gtest_list_tests
更多用法参考 GoogleTest 官方文档。
4.1.5 测试数据管理
测试数据位于
server/src/test/test_data/目录,各模块按需创建子目录使用
DtFramework工具获取测试数据路径:SRC_TEST_DATA:server/src/test/test_data/下的数据ROOT_TEST:项目根目录test/下的数据
TestSuit::SetUpTestSuite()会在测试套件初始化时解析test_rank_0/等真实 profiler 数据
4.1.6 覆盖率
覆盖率要求:行覆盖率达到 80%,分支覆盖率达到 60%
在 Linux 系统上,运行如下命令生成覆盖率:
cd build
bash cpp_coverage.sh
cpp_coverage.sh执行流程:预处理第三方依赖
使用
-D_PROJECT_TYPE=test构建带覆盖率插桩的insight_test执行
insight_test生成.gcda覆盖率数据使用 lcov 过滤 include/test/third_party 目录后生成覆盖率信息
使用 genhtml 生成 HTML 报告
覆盖率报告路径:
build_llt/output/cpp_coverage/result/index.html注意:当前 lcov/genhtml 报告生成功能暂时屏蔽,覆盖率数据文件(.gcda)仍正常生成
4.2 GUI 开发者测试
4.2.1 测试框架与配置
测试框架:Playwright 1.57 + TypeScript
测试代码位于项目根目录
e2e/下配置文件:
e2e/playwright.config.ts,关键配置如下:
配置项 |
值 |
说明 |
|---|---|---|
timeout |
60s |
单用例超时时间 |
workers |
1 |
并行 Worker 数 |
baseURL |
前端开发服务地址 |
|
headless |
true |
默认无头模式 |
viewport |
1920x1080 |
浏览器视口尺寸 |
webServer[0] |
profiler_server --wsPort=9000 |
自动拉起后端服务 |
webServer[1] |
framework npm run staging |
自动拉起前端开发服务 |
Playwright 会自动拉起前后端服务,无需手动启动。profiler_server 二进制路径根据操作系统自动选择:
Windows:
../server/output/win_mingw64/bin/profiler_server.exemacOS:
../server/output/darwin/bin/profiler_serverLinux:
../server/output/linux-{arch}/bin/profiler_server
4.2.2 测试目录结构
e2e/src/
├── components/                    # 可复用 UI 组件操作封装
├── page-object/                   # Page Object Model 类
├── tests/                         # 测试用例
│   ├── smoke/                     # 冒烟测试
│   ├── full-test/                 # 全量回归测试
│   ├── joint-test/                # 联调测试
│   └── performance-test/          # 性能基准测试
└── utils/                         # 测试工具函数
4.2.3 新增 GUI 测试用例步骤
创建 Page Object(如模块已有可跳过):在
e2e/src/page-object/下创建模块 Page 类,封装 iframe 定位与模块操作创建 spec 文件:在
e2e/src/tests/对应子目录下创建.spec.ts文件定义测试 Fixture:扩展 Playwright 的
test对象,注入 Page Object 和 WebSocket 连接
interface TestFixtures {
    timelinePage: TimelinePage;
    ws: Promise<WebSocket>;
}
const test = baseTest.extend<TestFixtures>({
    timelinePage: async ({ page }, use) => {
        const timelinePage = new TimelinePage(page);
        await use(timelinePage);
    },
    ws: async ({ page }, use) => {
        const ws = setupWebSocketListener(page);
        await use(ws);
    },
});
编写测试用例:使用
test.describe组织用例组,test.beforeEach完成数据准备,test编写具体场景在
page-object/index.ts中导出新 Page Object运行验证
4.2.4 测试数据管理
测试数据路径定义在
e2e/src/utils/constants.ts中主要数据目录:
常量 |
路径 |
用途 |
|---|---|---|
文件路径常量 |
|
Windows 本地全量测试数据 |
|
|
CI 冒烟测试数据(相对路径) |
|
|
联调测试数据(Linux 路径) |
测试数据可从数据仓库下载:https://gitcode.com/zhangruoyu2/msinsight-quick-start-demo.git
请在
constants.ts中修改路径为本地实际路径
4.2.5 常用测试命令
# 安装依赖(首次运行)
cd e2e
npm install
npx playwright install

# 运行全量回归测试
npm run test

# 运行冒烟测试
npm run test:smoke

# 运行联调测试
npm run jointTest

# 运行单个测试文件
npm run test timeline.spec.ts

# 运行单个测试用例(按名称过滤)
npm run test -- -g test_unitsExpandAndCollapse_when_click

# UI 交互模式(方便调试定位)
npm run test -- --ui

# 查看 HTML 测试报告
npx playwright show-report

# 自动化录制用例(Codegen)
npx playwright codegen localhost:5174 --viewport-size=1920,1080

# 更新快照
npx playwright test tests/full-test/framework.spec.ts -u

# Lint 检查
npm run lint
4.2.6 预冒烟测试(CI 环境)
Linux 环境(Docker)
推荐使用 Playwright 官方 Docker 镜像(参考),镜像 tag 为
v1.57.0-jammy从镜像创建容器后,安装前端和后端需要的其他依赖:
bash build/mindstudio_insight_gui_set_environment.sh
完成依赖安装后,执行预冒烟测试:
bash build/mindstudio_insight_gui_run.sh
gui_set_environment.sh:安装 gcc-11、cmake、ninja、pnpm 及 Python 依赖gui_run.sh:构建后端 → 构建前端模块 → 执行npm run test:smoke
Windows 环境
安装依赖参考 GUI 指导文档
cd e2e
npm run test:smoke
4.2.7 注意事项
WS 连接冲突:运行前请关闭浏览器中已打开的 Insight 页面,WS 同时只能保持一个连接
无头模式一致性:快照必须在无头模式(
headless: true)下生成,有头/无头模式下快照存在差异定位器选择:优先使用
getByRole()/getByText()/getByTestId()等稳定定位器,避免使用 Emotion 自动生成的类名避免硬等:不使用
page.waitForTimeout(),应通过 WS 事件或元素可见性进行同步缩小快照范围:快照断言时尽量缩小到功能影响区域,截图前将鼠标移出区域(
page.mouse.move(0, 0))串行执行:默认测试并行执行,需要串行时在
test.describe内设置test.describe.configure({ mode: 'serial' })
5. Pull Request 提交流程
5.1 提交前检查
在提交 PR 之前,请确保:
代码通过本地编译和构建
pre-commit 代码检查全部通过(参见 2.6 配置 pre-commit)
后端代码变更需补充 DT,行覆盖率 >= 80%,分支覆盖率 >= 60%
前后端代码变更需通过预冒烟测试(参见 4.2.6 预冒烟测试(CI 环境))
涉及用户端功能的改动,请同步更新对应的用户和开发者文档
每个 PR 仅包含一个 commit(如有多 commit 请先合并)
5.2 PR 标题规范
请在 PR 标题前添加合适的前缀,以明确 PR 类型:
前缀 |
说明 |
|---|---|
|
底座平台相关 |
|
公共模块相关 |
|
系统调优-时间线相关 |
|
系统调优-内存相关 |
|
系统调优-算子相关 |
|
系统调优-内存详情相关 |
|
系统调优-集群详情相关 |
|
系统调优-强化学习相关 |
|
系统调优-专家建议相关 |
|
算子调优相关 |
|
服务化调优相关 |
示例:[Timeline] 新增 xxx 泳道支持
5.3 PR 模板
请遵循 Pull Request 模板 填写以下内容:
PR 描述:说明变更内容和变更原因,关联 issue 号(如有)
面向用户的变更:是否包含 API、UI 或其他行为变更
功能验证:自验截图、UT 覆盖说明
5.4 多提交合并为单 Commit
如果当前分支包含多个 commit,请使用以下方法合并为单个 commit:
方式一:交互式变基(推荐)
# 查看需要合并的最近几个 commit
git log --oneline -n 3

# 启动交互式 rebase(将 N 替换为需要合并的 commit 数量)
git rebase -i HEAD~N

# 在编辑器中:保留第一个 pick,其余改为 squash(s)
# 保存后编写合并后的 commit 信息

# 强制推送(仅限自己的特性分支)
git push --force-with-lease origin your-branch-name
方式二:reset + 新建 commit
# 获取最新的目标分支
git fetch origin main

# Soft-reset 到主干分支(修改保留在暂存区)
git reset --soft origin/main

# 将所有更改提交为一个新的 commit
git commit -m "feat: concise description of your change"

# 强制推送
git push --force-with-lease origin your-branch-name
警告:切勿对共享或受保护的分支执行强制推送。
5.5 提交与合入
完成上述准备工作后提交代码
输入
compile命令触发机器人编译流水线流水线编译通过后联系仓库管理和维护成员进行检视与合入